
APEX ORIN NX II External GPS Time Synchronization#
Using External GPS Time Synchronization#
SYNC IN is mainly used to receive the PPS signal from a GPS device. Together with GPRMC messages received over the serial port, this allows an external GPS device to provide system time synchronization.
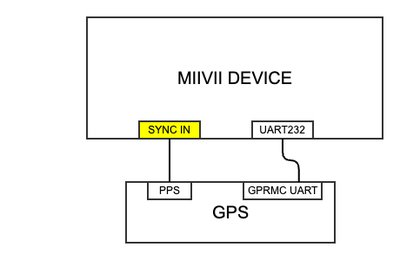
Operating Instructions#
Set the Time Synchronization Mode (Required)#
In MIIVII SETTINGS, change the time synchronization mode to External GPS.

Select the Serial Port (Optional)#
By default, /dev/ttyUART_232_B is used for time synchronization. To change the device node used for time synchronization, follow these steps:
cd /opt/miivii/config/sync/
vim gpsd

# Change the following line to the device node you want to use.
DEVICE="/dev/ttyTHS4"

# Set the serial port baud rate to 115200.
GSPD_OPTIONS="-b -n -s 115200"
Verification#
# Change the system time.
sudo date -s 12:12

# Wait approximately 1 minute.
# Check whether the system time automatically changes to the current time. If it does, GPS time synchronization is working. Otherwise, GPS time synchronization is not working.
Troubleshooting#
Q: What should I do if time synchronization fails?
Place the GPS receiver outdoors where reception is good, and confirm that it receives a signal.
Use a serial port tool to check the GPS output baud rate and confirm that it matches the configured value.
Use an oscilloscope to check whether the GPS PPS signal is output normally.
GPS Time Synchronization Troubleshooting#
Symptom: An external GPS receiver cannot synchronize a MIIVII device#
Check 1: Hardware Connections#
Step 1: Check the Wiring#
Wiring reference: https://wiki.miivii.com/pages/viewpage.action?pageId=182034093
(The default device node for time synchronization is /dev/ttyUART_232_B.)
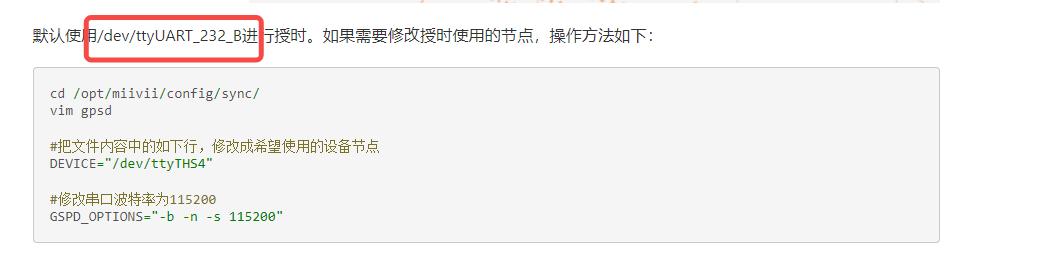
If the wiring is correct, continue with “Step 2”.
If the wiring is incorrect, correct it.
Step 2: Cross-Check with Another Device (If Available)#
If another device that supports external GPS time synchronization is available, use it for a cross-check.
If the other device also fails to synchronize with the GPS receiver, check the GPS receiver itself.
If the other device synchronizes successfully, continue with “Check 2: GPS Antenna”.
Check 2: GPS Antenna#
Step 1: Check the Antenna Connection and Position#
Install the GPS antenna correctly and place it outdoors with a clear view of the sky.
Check for physical damage or a poor antenna connection.
If possible, replace the antenna with one known to work to rule out an antenna fault.
If the antenna connection is incorrect, correct the connection or antenna position.
If the antenna is connected and positioned correctly, continue with “Check 3: Configuration”.
Check 3: Configuration#
Step 1: Check the Time Synchronization Mode in the Web GUI#
Open the Web GUI and confirm that GPS is selected as the time synchronization mode.

If GPS is not selected, select “GPS”.
If GPS is selected, continue with “Step 2”.
Step 2: Check Whether the Serial Port Baud Rate Matches the External GPS Receiver#
Use stty to check the serial port settings.
stty -F /dev/ttyS0 -a
Replace /dev/ttyS0 with the serial device node you are using.
Check the external GPS receiver baud rate.
Confirm that the baud rates checked in Steps 1 and 2 match.
If the baud rates differ, change them to the same value.
If the baud rates match, continue with “Check 4: chrony Synchronization Status”.
Check 4: chrony Synchronization Status#
Step 1: Run chronyc sources to Check the Current Clock Sources#

The PPS source must show #*, indicating that chrony has selected PPS as the primary clock source.
The GPSD source shows #?, indicating that chrony considers GPSD to be normal.
The normal status is shown below:

If no PPS signal is received, check the connecting cable.
If a PPS signal is received, continue with “Check 5: PPS Signal Input”.
Check 5: PPS Signal Input#
Step 1: Check the PPS Signal Input#
Use ppstest to obtain the PPS signal:#
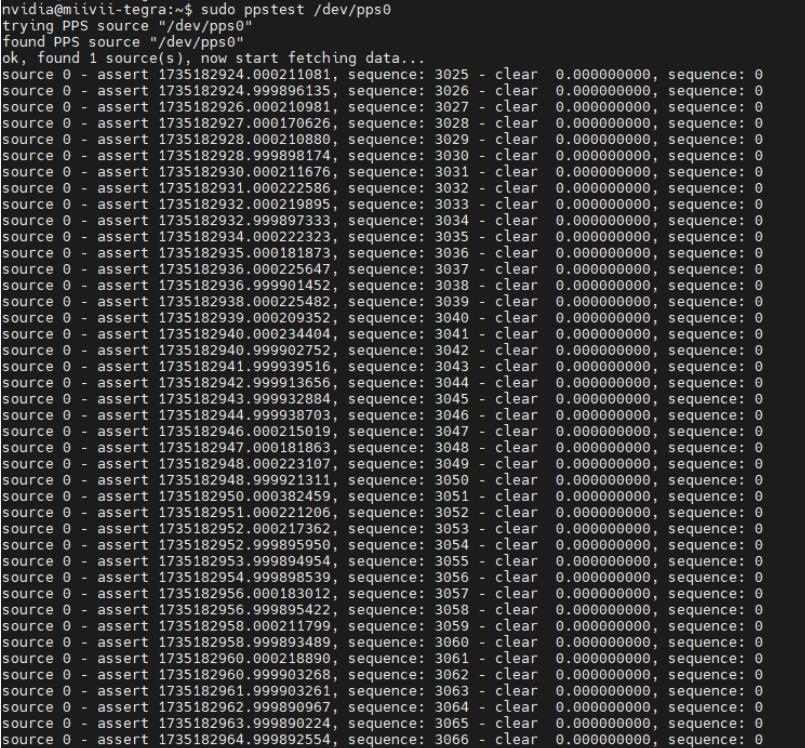
sudo ppstest /dev/pps0
If the signal is normal, the following output appears. Calculate the PPS interval from the assert values (UNIX timestamps); the normal interval is 1 second.#
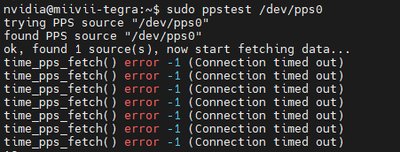
When the PPS connection is disconnected (no PPS input), The following example shows the output:
If the signal interval is incorrect, check the PPS source itself.
If the signal interval is correct, continue with “Check 6: GPS Status”.
Check 6: GPS Status#
Step 1: Check the GPS Status#
Run gpsmon. The window that opens shows basic GPS information, including positioning, time, and PPS:
The normal status is shown below:
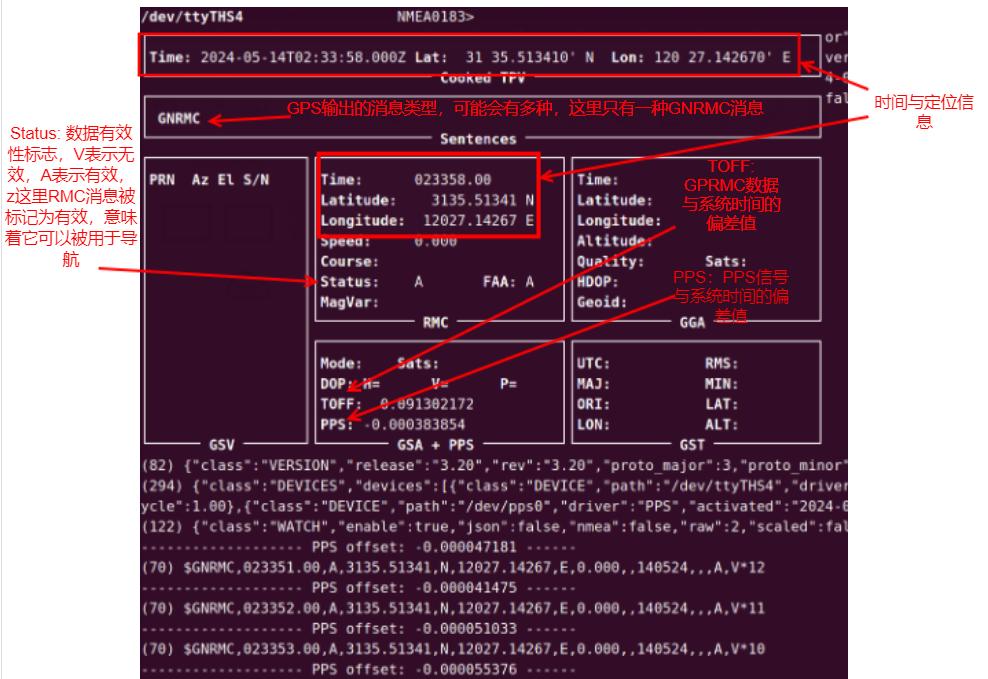
When the GPRMC connection is disconnected (no GPRMC input), the output is as follows:

If the GPS status is abnormal, check the GPRMC wiring.
If the GPS status is normal but GPS time synchronization still fails, continue with “Check 7: Reflash the Image to Check for a Software Environment Issue”.
Check 7: Reflash the Image to Check for a Software Environment Issue#
Step 1: Flash the Image#
Image flashing instructions: https://wiki.miivii.com/pages/viewpage.action?pageId=182034027.
If serial communication works normally after reflashing the image, the issue is caused by the system software environment. The customer needs to investigate that environment.
If synchronization still fails after reflashing, continue with “Step 2”.
Step 2: Collect Logs#
Connect the device to the Internet, open a terminal, and enter:
curl -sSL https://doc.miivii.com/scripts/run_miivii_diagnostic.sh | bash -s gps-timing
Export the logs and the files under /var/log, upload them to the support ticket, and submit them to MiiVii Technical Support.