APEX AD10 GMSL Camera Obtains the Camera Timestamp#
Camera working mode selection#
Work mode |
Pattern description |
Differences in usage |
Attention |
|---|---|---|---|
Camera self-triggering |
After the camera is powered on, it takes pictures at the default supported frequency. |
You can use the default Linux method and the SDK to obtain images. |
All cameras need to use the same working mode. |
Function and role:#
When users want to accurately record the start time of exposure for each frame of image for time matching with other sensors, this working mode can be used to achieve that.
After enabling the “Use Timestamp” mode, the camera system will provide high-precision hardware timestamp information, directly associated with the start time of exposure of each picture. To ensure the absolute accuracy of the timestamp, the camera will remain in standby state after initialization until the image acquisition process is started through the dedicated SDK. At this time, the camera will start shooting and be strictly synchronized with the system clock.
Key advantages:#
High - precision time reference: The core value lies in providing hardware timestamps with microsecond - level or even higher precision, accurately marking the exposure start point of each frame of image.
System - level time synchronization: All cameras that support this function share the same time reference. The trigger frequency is uniformly set to the frequency commonly supported by all cameras under this reference, ensuring the comparability and synchronization of timestamps between frames collected by different cameras.
Elimination of startup interference: Before the application officially starts acquisition through the SDK, the camera is in an inactive state and does not generate any image data or timestamps. This ensures that from the first frame of acquisition, the timestamps are accurate, pure, and strictly aligned with the application startup time.
Ensuring data reliability for critical applications: By strictly controlling the acquisition startup timing and timestamp generation mechanism, a reliable data foundation is provided for algorithms and systems that rely on accurate time information.
Application scenarios:#
This feature is applicable to scenarios with strict requirements for the absolute time or relative time difference of image frames. For example:
Multi-sensor fusion:Autonomous driving/robot positioning and navigation: Accurately aligning the timestamps of camera images with LiDAR point clouds, millimeter-wave radar signals, and IMU data is crucial for precise environmental perception and positioning.Industrial automation: Aligning the images of the position and posture of workpieces captured by cameras with robot motion control commands and sensor readings at the millisecond level to achieve precise closed-loop control.
High-speed motion analysis and measurement: Recording the position and state of high-speed moving objects at specific moments requires accurately knowing the exposure time points corresponding to each frame of images to calculate speed, acceleration, or conduct trajectory analysis.
Synchronized multi-camera systems: When multiple cameras need to work independently but their image data ultimately needs to be post-processed and aligned based on precise timestamps (such as offline multi-view 3D reconstruction or event analysis).
Scientific experiment data recording: In physics, biology, and other experiments, it is necessary to precisely correlate the visually captured phenomena with the data recorded by other experimental equipment (such as high-speed data acquisition cards, signal generators) on the time axis.
Event analysis: Analyzing the images of several frames before and after a specific event (such as impact, flash, failure) occurs. Precise timestamps help determine the exact moment and duration of the event.
Usage method#
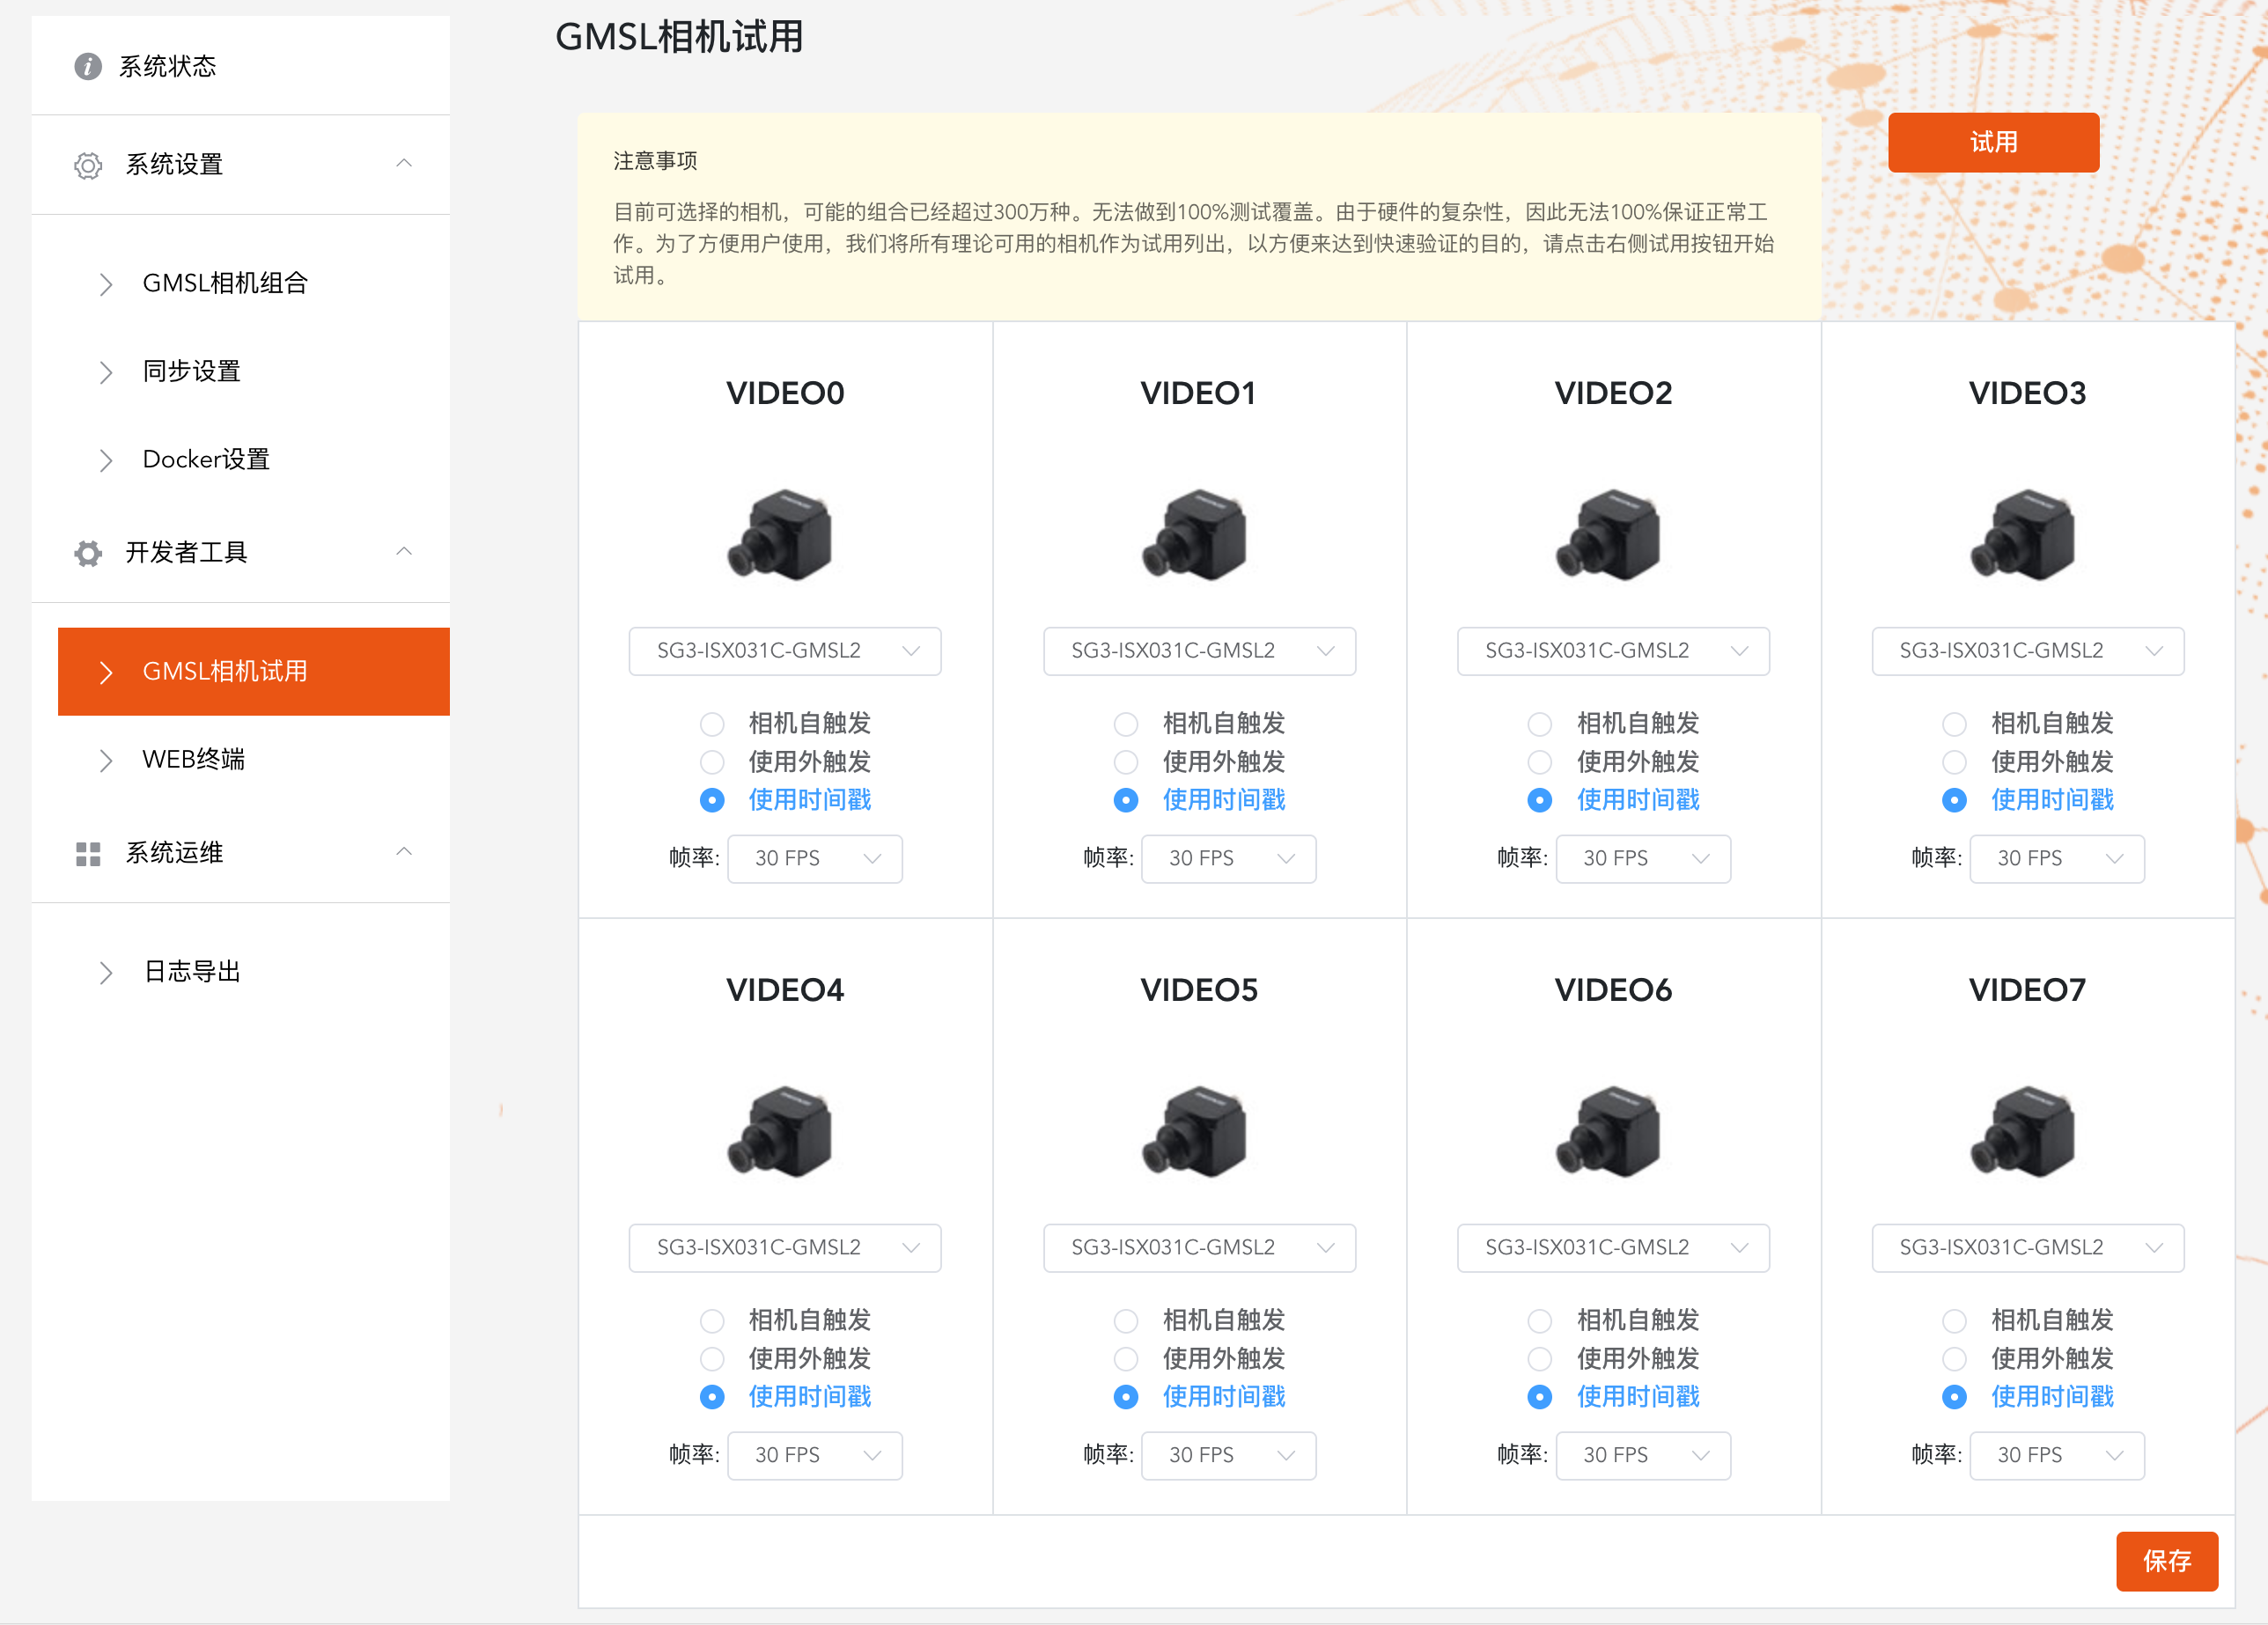
After selecting the corresponding camera, if the camera supports obtaining the timestamp, the “Use Timestamp” option can be selected.
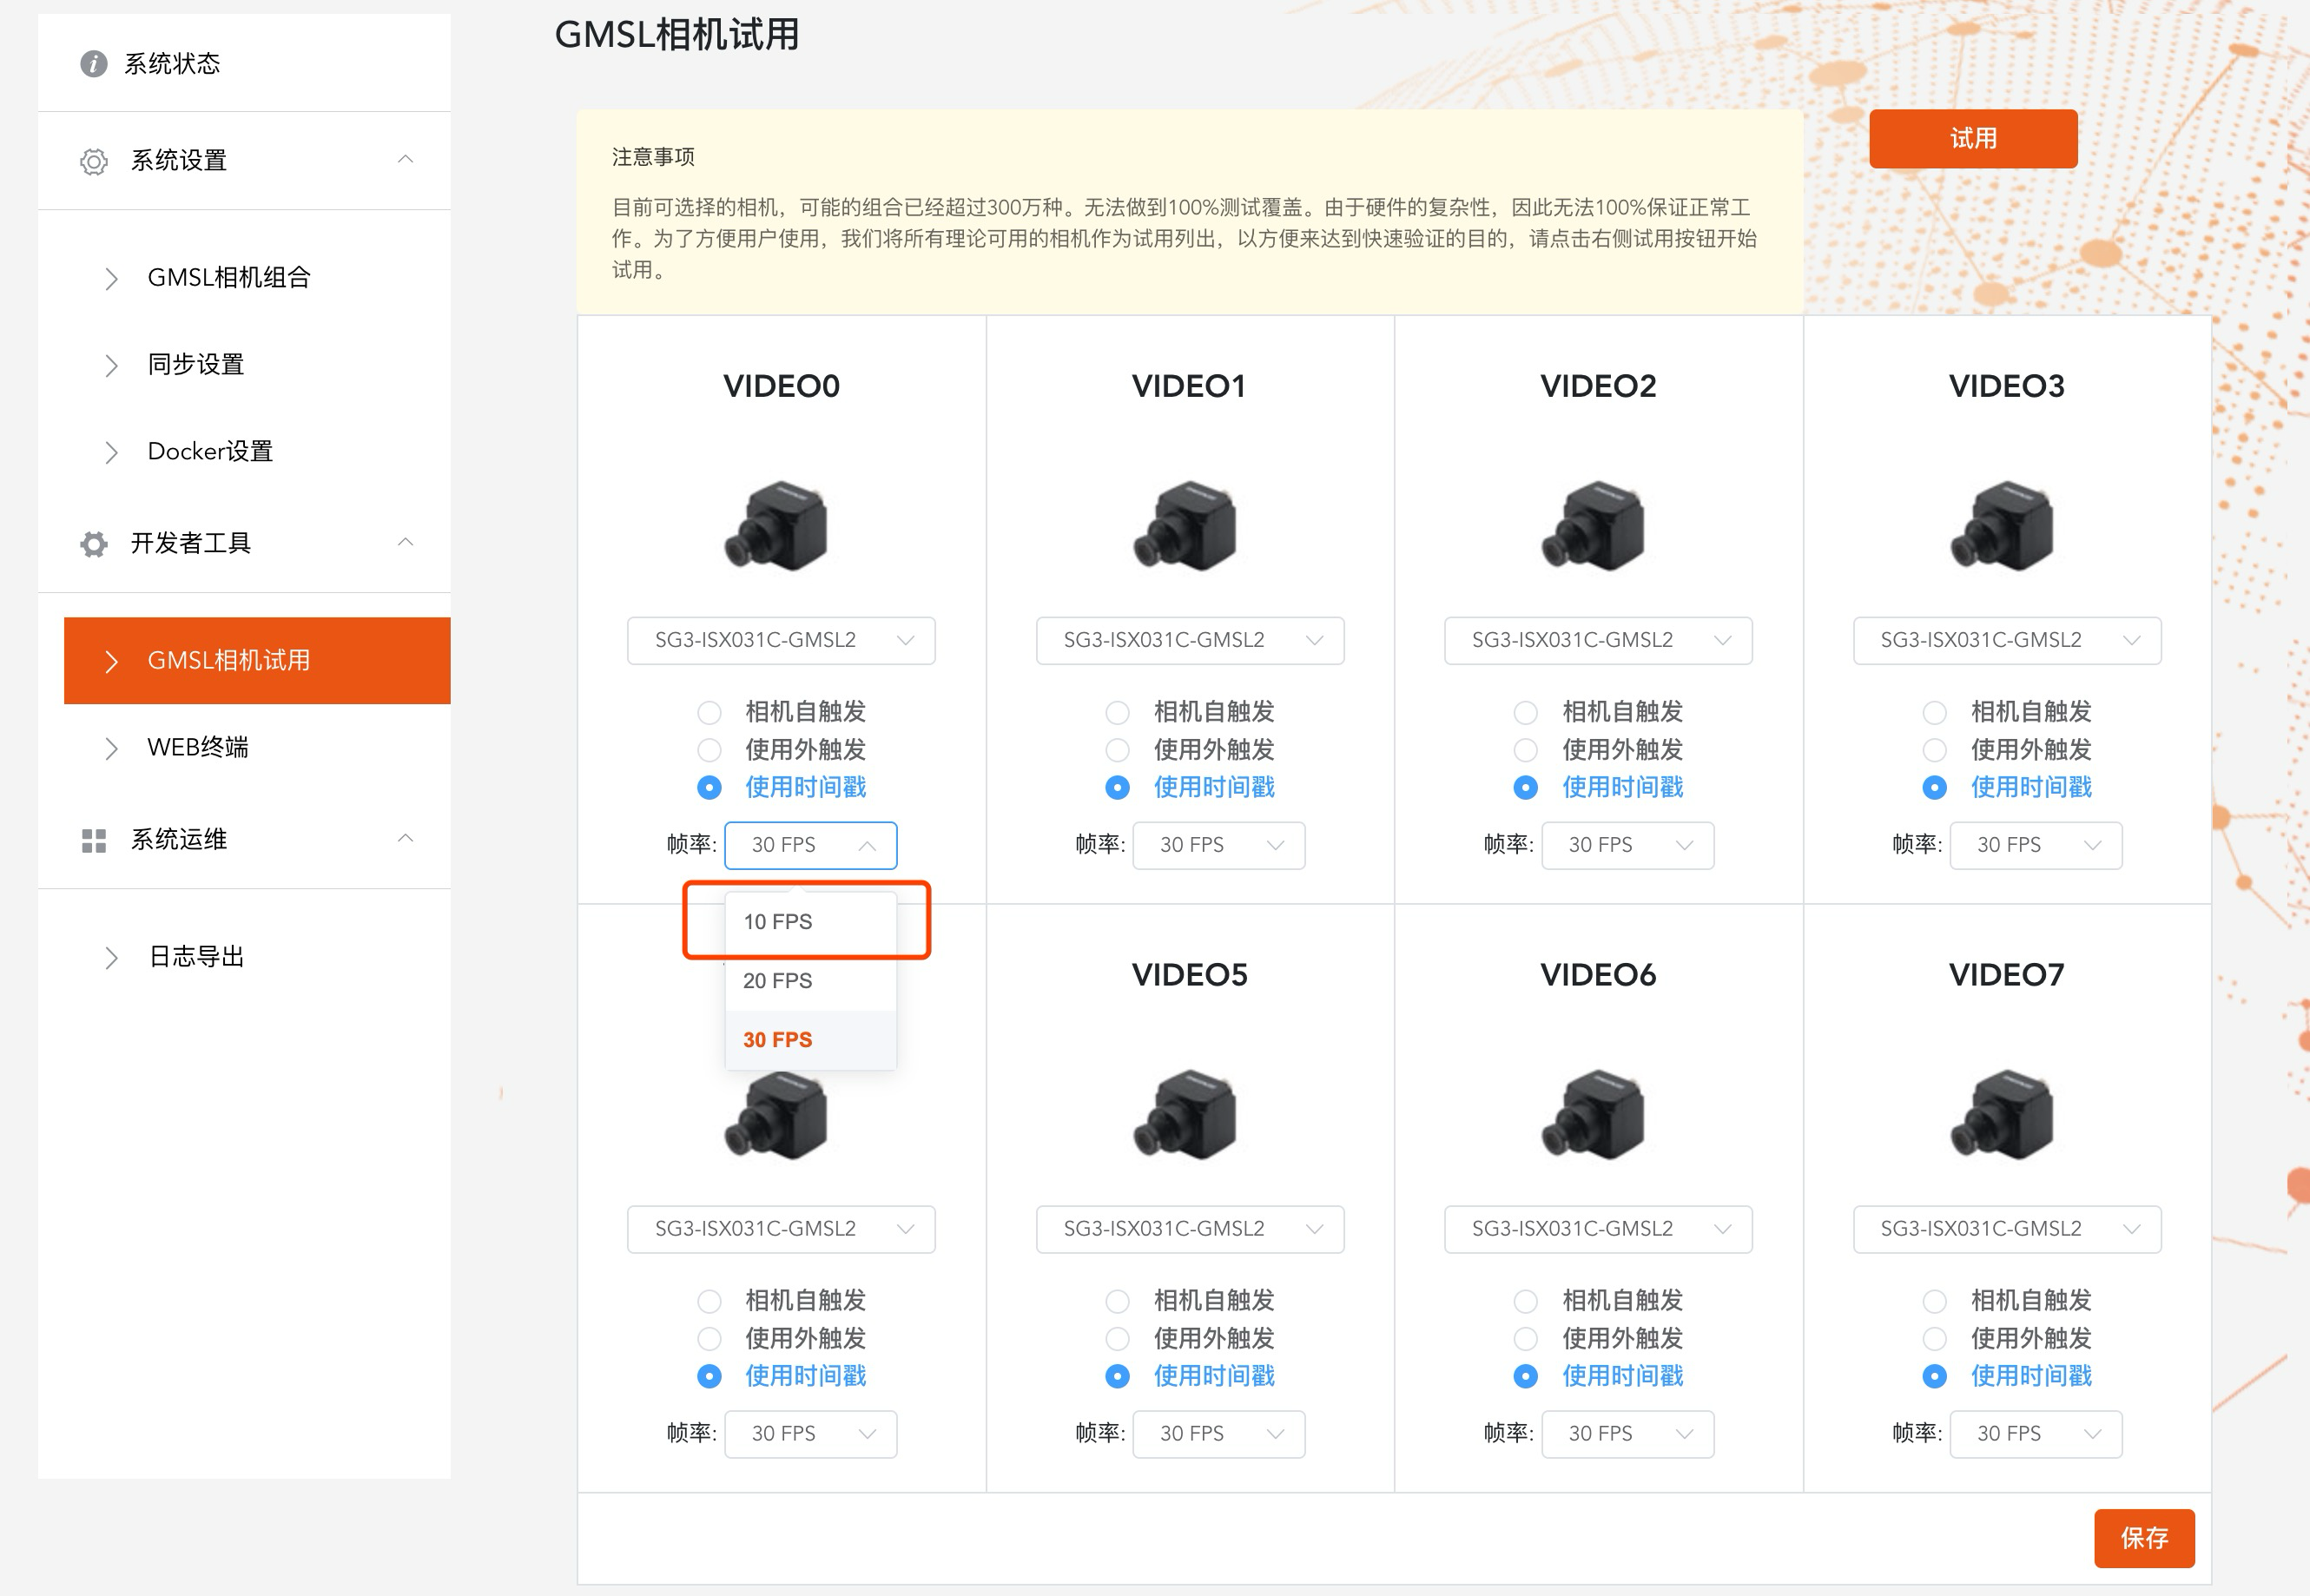
Select the supported trigger frequency.
Since the trigger is the same for all cameras, the selectable frequencies are the trigger frequencies commonly supported by all cameras.
Use
# Open one camera and obtain the timestamp
CHECK_TIME=1 /opt/miivii/features/gmsl_camera/bin/cameras_sdk_demo -s 1280x720 -d /dev/video0
Problems and solutions.#
In the timestamp mode, why can’t the camera be opened with V4L.In the timestamp mode, opening the camera with V4L is not supported.
If you need to use V4L, please use the “External trigger” mode.
# export CHECK_TIME=1   Debugging use log. Do not execute during testing, otherwise too much log will block the program
sudo jetson_clocks
rm /tmp/cameras_sdk_demo.log
./bin/cameras_sdk_demo

# Print logs will be added to the screen print
# In the /tmp/
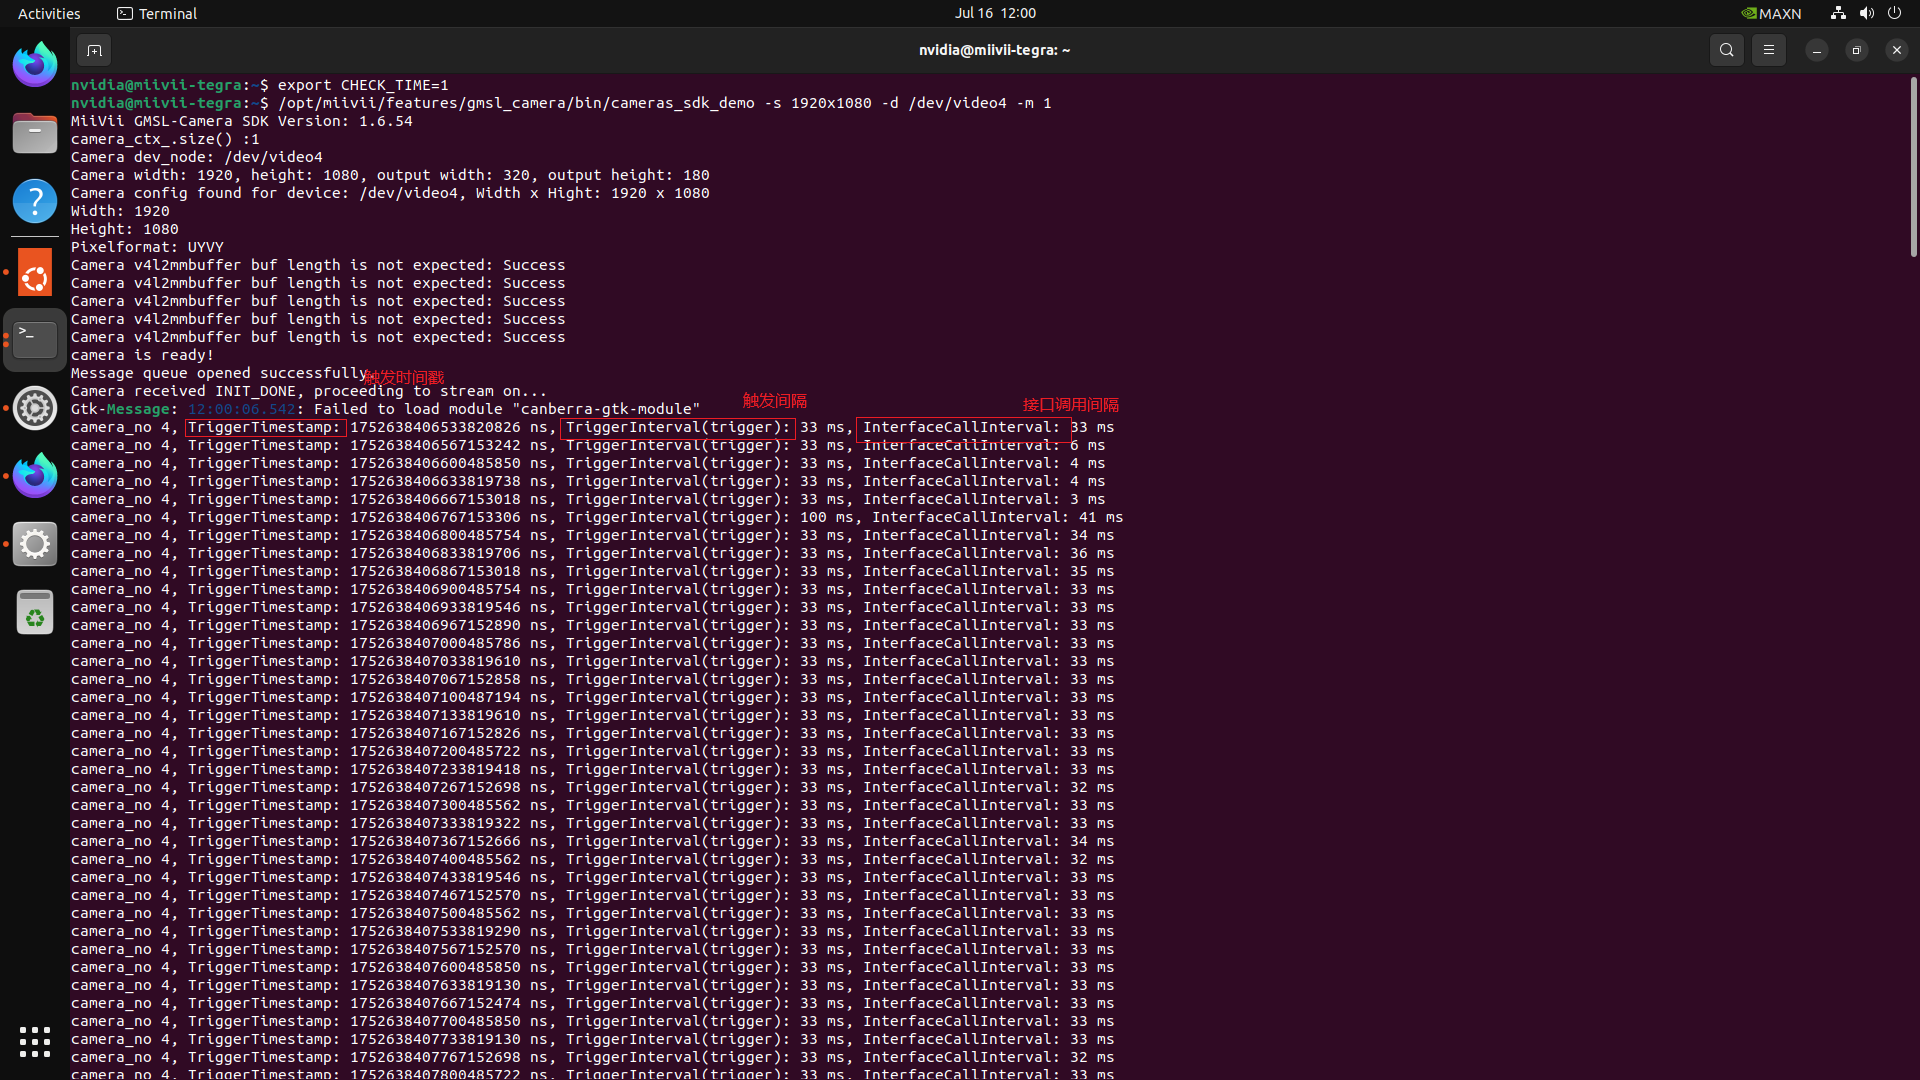
字段 |
单位 |
物理含义 |
测试方法 |
|---|---|---|---|
TriggerTimestamp |
nanosecond |
The time when this frame is triggered |
The trigger time obtained from the queue according to the transmission delay |
TriggerInterval(trigger) |
millisecond |
Trigger interval |
The difference from the previous Timestamp |
InterfaceCallInterval |
millisecond |
Interface call interval |
How to confirm whether the timestamp is accurate?#
In the code, the accuracy of the timestamp will be confirmed by checking the FrameInterval.
Execute the command:
# export CHECK_TIME=1   Debugging use log. Do not execute during testing, otherwise too much log will block the program
sudo jetson_clocks
rm /tmp/cameras_sdk_demo.log
./bin/cameras_sdk_demo -s 1280x720 -d /dev/video0
If the timestamp is normal, no log file will be generated. If the timestamp is abnormal, a log file will be generated and multiple sets of timestamps will be recorded in /tmp/cameras_sdk_demo.log.
Timestamp : 1620958367246484576 FrameInterval  :  1620958367246484576 FrameTransferDelay : 67111424 LinuxGetFrameTime : 1620958367313596000 LinuxFrameInterval : 1620958367313596000
Timestamp : 1620958739646034432 FrameInterval  :  1620958739646034432 FrameTransferDelay : 67403568 LinuxGetFrameTime : 1620958739713438000 LinuxFrameInterval : 1620958739713438000
Timestamp : 1620958748796023808 FrameInterval  :  1620958748796023808 FrameTransferDelay : 80901192 LinuxGetFrameTime : 1620958748876925000 LinuxFrameInterval : 1620958748876925000
Timestamp : 1620958789795973504 FrameInterval  :  1620958789795973504 FrameTransferDelay : 72186496 LinuxGetFrameTime : 1620958789868160000 LinuxFrameInterval : 1620958789868160000
Timestamp : 1620959793244763712 FrameInterval  :  1620959793244763712 FrameTransferDelay : 73185288 LinuxGetFrameTime : 1620959793317949000 LinuxFrameInterval : 1620959793317949000
Timestamp : 1620959854794691840 FrameInterval  :  1620959854794691840 FrameTransferDelay : 68099160 LinuxGetFrameTime : 1620959854862791000 LinuxFrameInterval : 1620959854862791000
Timestamp : 1620960274844196896 FrameInterval  :  1620960274844196896 FrameTransferDelay : 68391104 LinuxGetFrameTime : 1620960274912588000 LinuxFrameInterval : 1620960274912588000
Timestamp : 1620960283994186240 FrameInterval  :  1620960283994186240 FrameTransferDelay : 71857760 LinuxGetFrameTime : 1620960284066044000 LinuxFrameInterval : 1620960284066044000
Timestamp : 1620960291394178080 FrameInterval  :  1620960291394178080 FrameTransferDelay : 68419920 LinuxGetFrameTime : 1620960291462598000 LinuxFrameInterval : 1620960291462598000
How to confirm the precision of the timestamp?#
Execute the command
# export CHECK_TIME=1   Logs for debugging purposes. Do not execute during testing, otherwise too many logs may block the program.
sudo jetson_clocks
./bin/cameras_sdk_demo -s 1280x720 -d /dev/video0 > log
Confirmation method
Import the log into Excel
Take the maximum and minimum values of FrameInterval
By calculating the difference between the maximum and minimum values, the timestamp accuracy can be obtained.