APEX THOR 5G Usage#
5G Support List#
M.2 B Key 5G Support List#
NO. |
Brand |
Product NO. |
Interface |
Module function |
Operating temperature |
Spec |
Note |
|---|---|---|---|---|---|---|---|
1 |
Quectel |
RM520N-CN |
M.2 B KEY |
5G |
-30 °C ~ +75 °C |
SA DL 2.4 Gbps; UL 900 Mbps |
|
2 |
Quectel |
RM520N-GL |
M.2 B KEY |
5G |
-30 °C ~ +75 °C |
SA DL 2.4 Gbps; UL 900 Mbps |
Hardware selection#
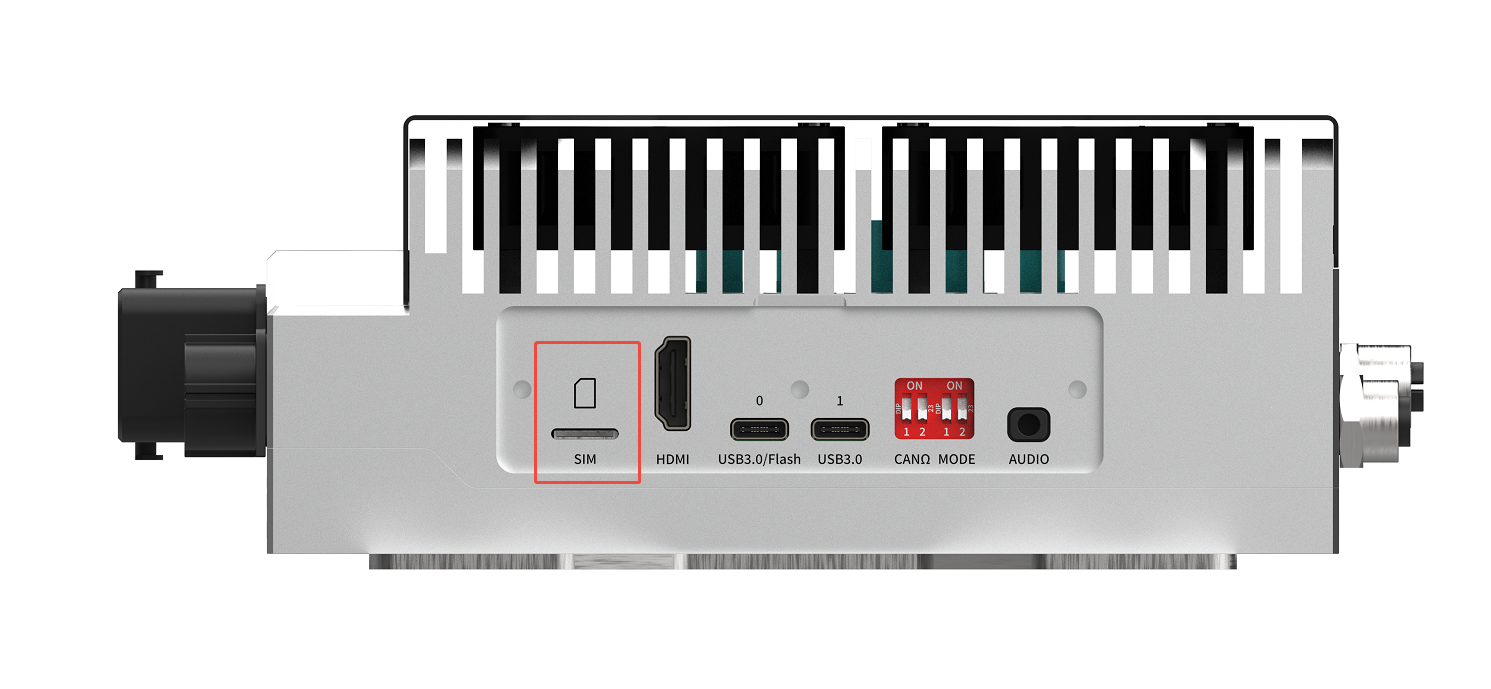
SIM Card Installation#
5G module installation#
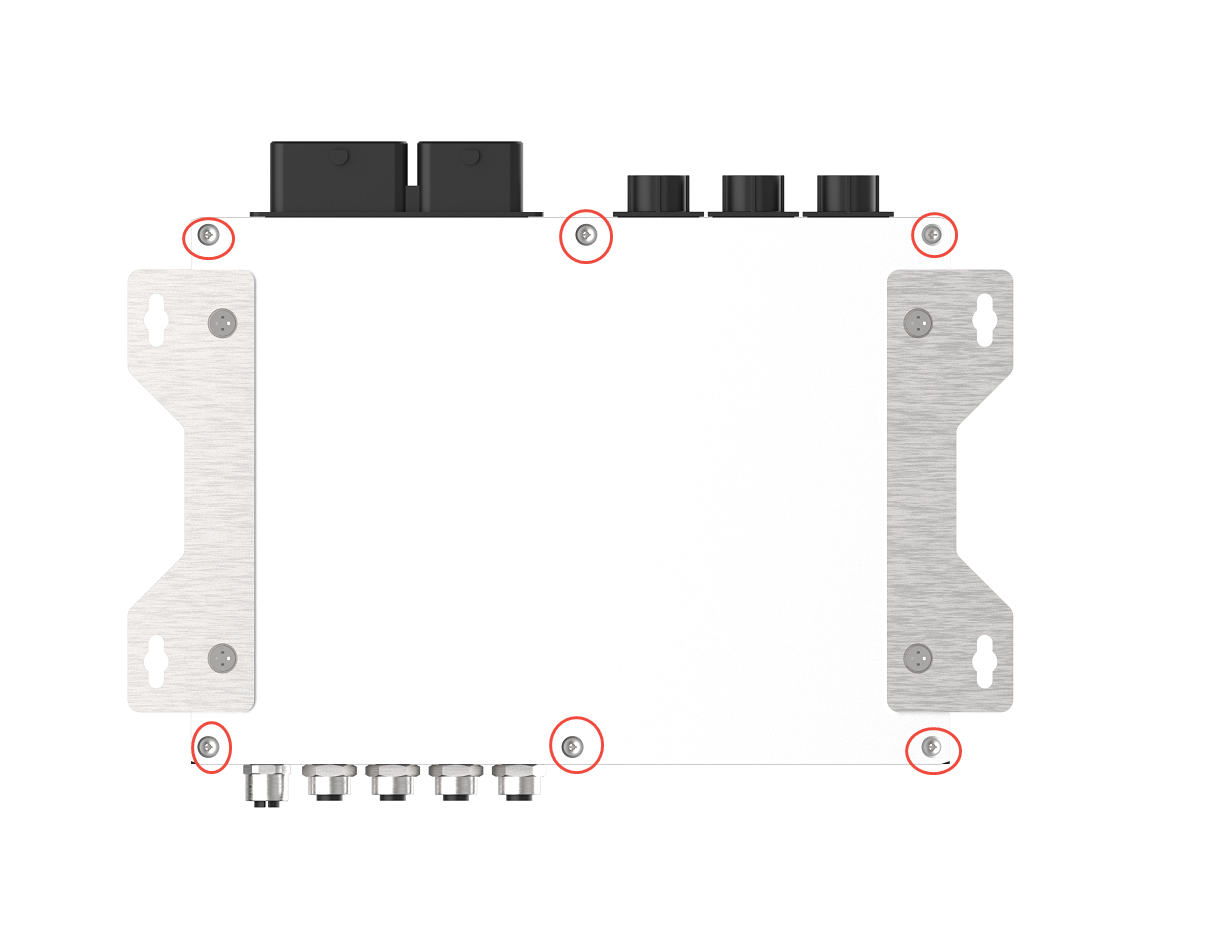
Remove the bottom panel:
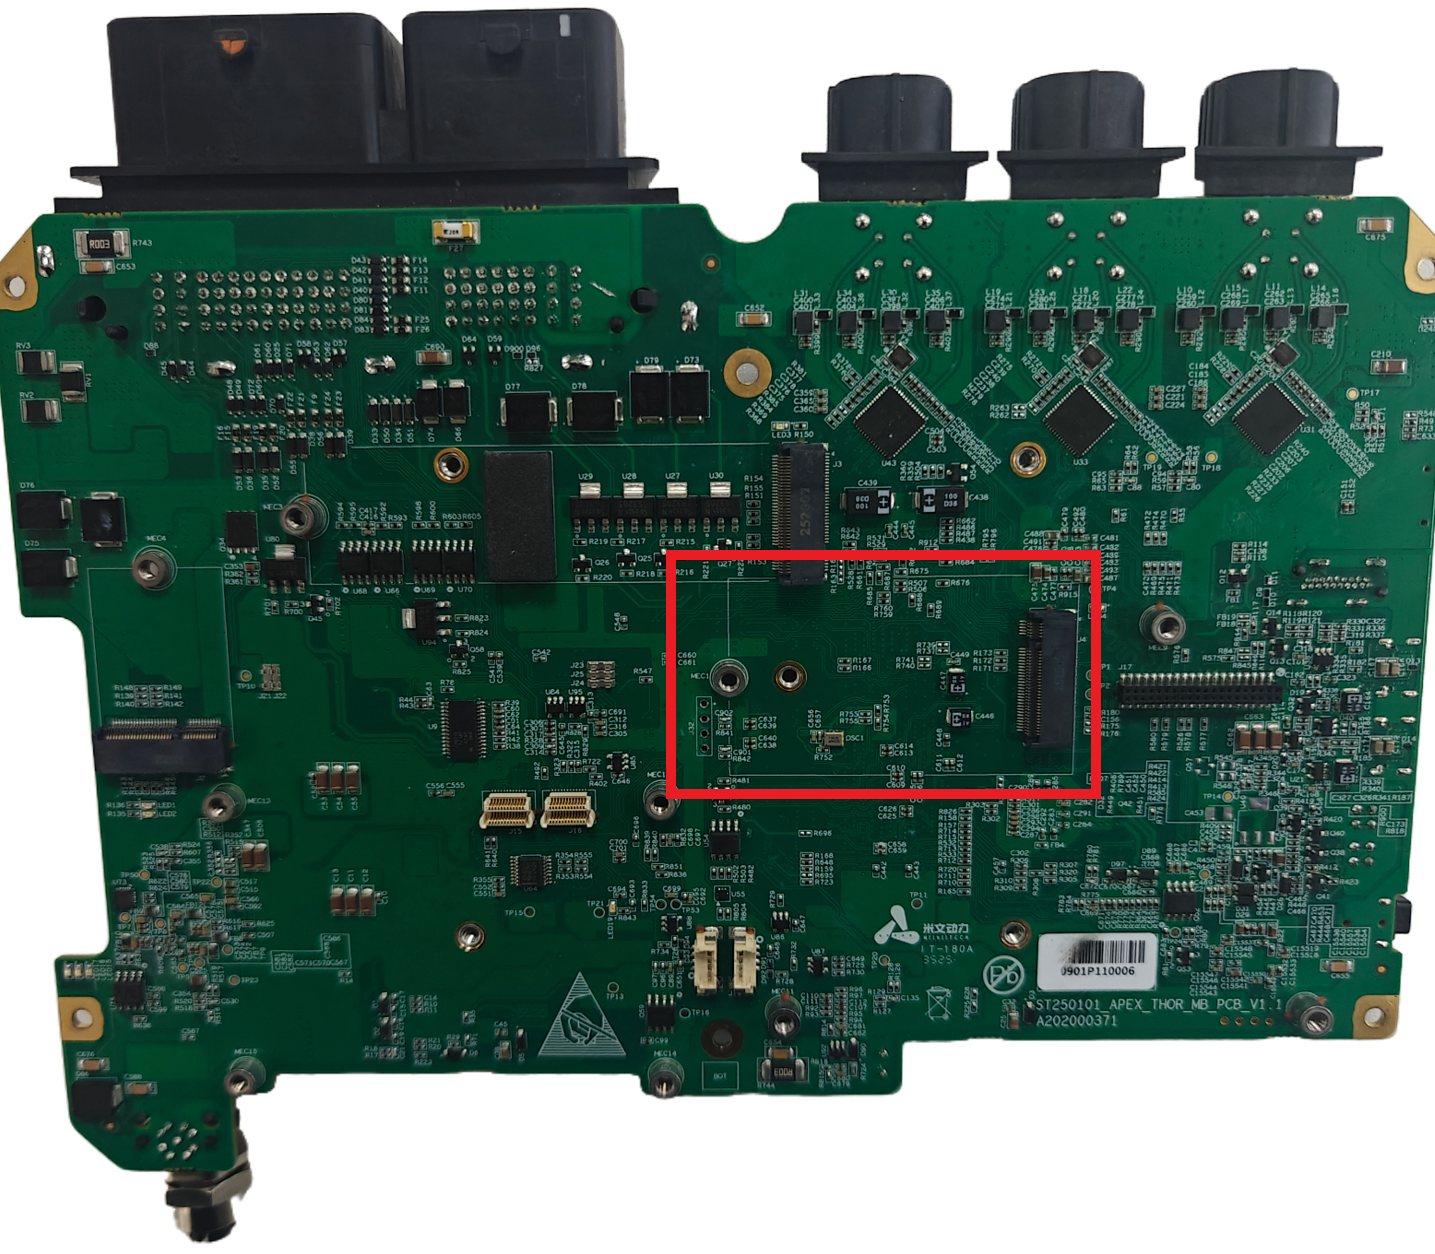
Installation of 5G module:
开机自启动设置#
米文内置的驱动无需任何额外配置,就是开机自动启动和自动拨号的状态。
模块配置方法#
请注意如果您使用的是物联网SIM卡,则会出现SIM卡与设备硬件绑定的问题,请提前与通讯供应商确认。
米文的系统镜像中,整合了相应的模块驱动。安装好模块后系统会自动识别。
确认连接状态#
4G/5G problem troubleshooting#
Check item 1: Inspect the hardware environment#
Step 1. Confirm whether the 4G/5G model is a Miwen compatible model#
Find the compatible model from the user manual. Example AD10:https://doc.miivii.com/Apex-AD10-User-Manual-CH/wiki/Apex-AD10-4G.html。
If it is not a Miwen compatible model, it is recommended that the customer replace it with a 4G/5G model.
If it is a model adapted for Miwen, execute “Step 2”.
Step 2. Confirm that the 4G/5G module is correctly inserted into the slot and that the antenna is properly connected#
Open the back cover, confirm that the 4G/5G module is properly inserted. For the usage method of 4G/5G, you can refer to the user manual of the corresponding product. For example, the installation method of AD10-4G:https://doc.miivii.com/Apex-AD10-User-Manual-CH/wiki/Apex-AD10-4G.html。
Note: 4G is connected to 1 antenna, and 5G is connected to 2 antennas.
Step 3. Ensure that the SIM card is inserted in the corresponding position of the slot#
Open the back cover and check whether the SIM card installation position corresponds to the position of the 4G/5G module.
Check Item 2: Cross-validation (if conditions permit)#
Step 1. If multiple devices are available, cross-validation can be performed.#
Cross-validation method: The faulty device is called “Device A”, the faulty device’s 4G/5G is called “Module A”, and the faulty device’s “SIM card” is called “SIM Card A”; the normal device is called “Device B”, the normal device’s 4G/5G is called “Module B”, and the normal device’s “SIM card” is called “SIM Card B”.
Cross-validation:
Device A + Module A + SIM Card A
Device A + Module A + SIM Card B
Device A + Module B + SIM Card A
Device A + Module B + SIM Card B
Device B + Module A + SIM Card A
Device B + Module A + SIM Card B
Device B + Module B + SIM Card A
Device B + Module B + SIM Card B
The above test can clearly identify the fault point (Device A/Module A/SIM card A)
If the fault point points to the module and the SIM card, execute “Step 2”.
If the fault point points to Device A, execute “Troubleshooting Item 4: Re-flash the image to verify if it is caused by the software environment”.
Step 2: Clarify the handling method after identifying the fault point#
The fault point points to the module: replace the module or consult the module manufacturer.
The fault points to the SIM card: confirm whether the SIM card has sufficient balance and is capable of connecting to the network.
Note: If the SIM card is strongly bound to the module, it can only be used one-to-one; otherwise, it needs to be unbound before testing.
Check item three: Verify using the command line#
Step 1: lsusb Check the device connection status#
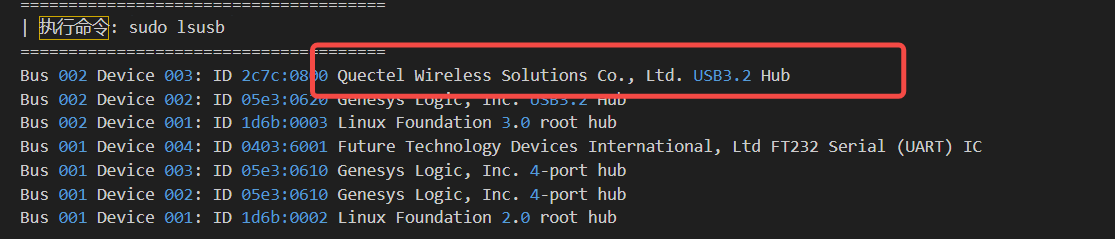
If the driver cannot be recognized properly, it is recommended to first check for hardware issues.
Step 2: Run ifconfig -a to check if the network card driver can be identified#
As shown in the figure below, that is, the driver is recognized normally, execute “Step 3”
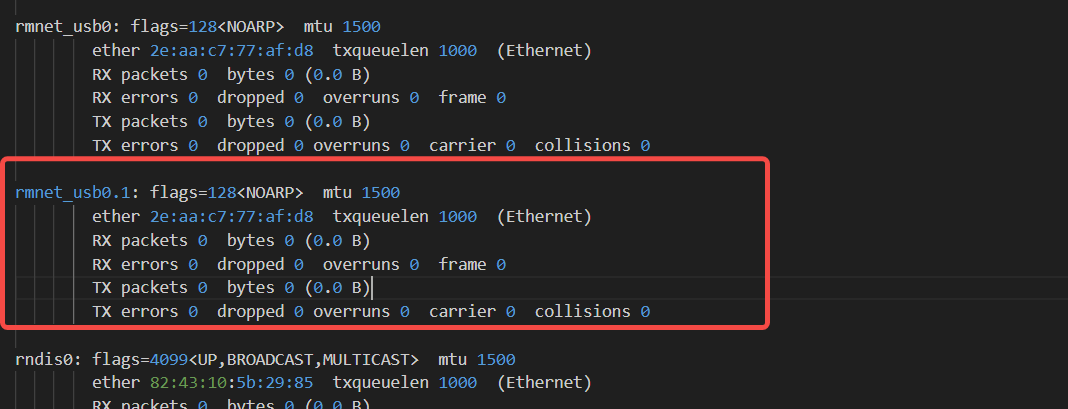
If the driver cannot be recognized properly, it is recommended to: first, check for hardware issues; second, reflash the image to rule out software environment problems.
Step 3: sudo ls -l /sys/class/net to check the status of network interfaces#
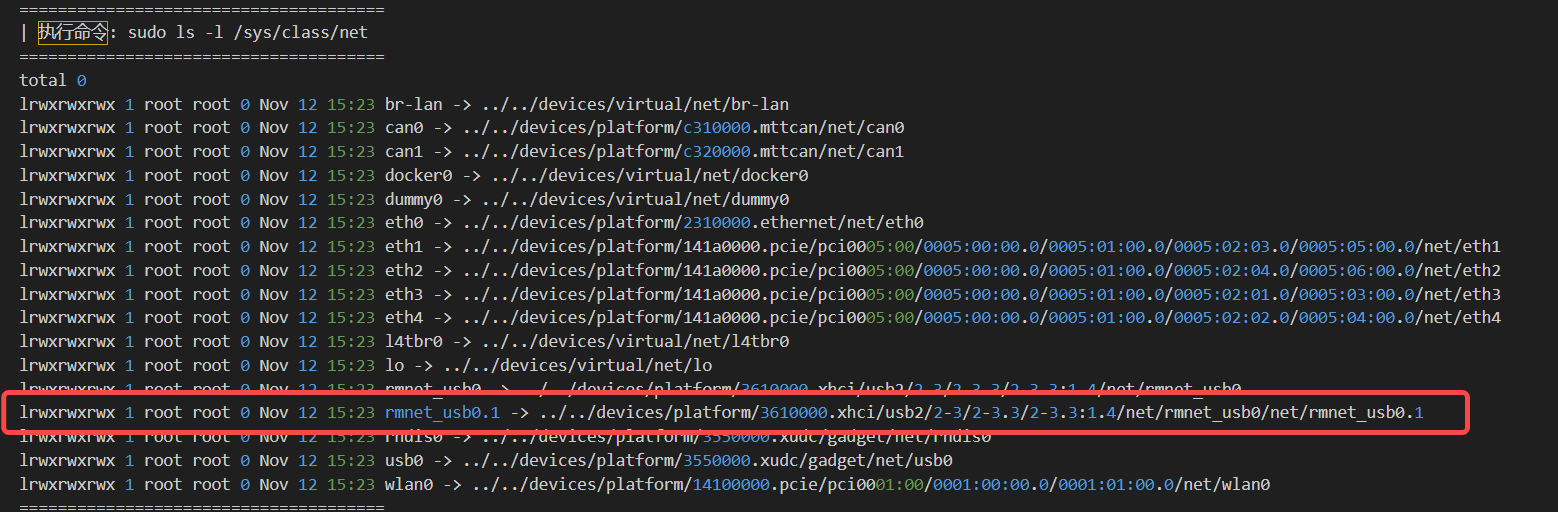
If the node is as shown in the above figure, it is normal; execute “Step 4”.
If there is no such node, it indicates that the network interface status is abnormal. Re-flash the image to eliminate software environment issues.
Step 4: sudo systemctl status NetworkManager.service to check the status of NetworkManager.service#
Open the terminal and use the command:
sudo systemctl status NetworkManager.service
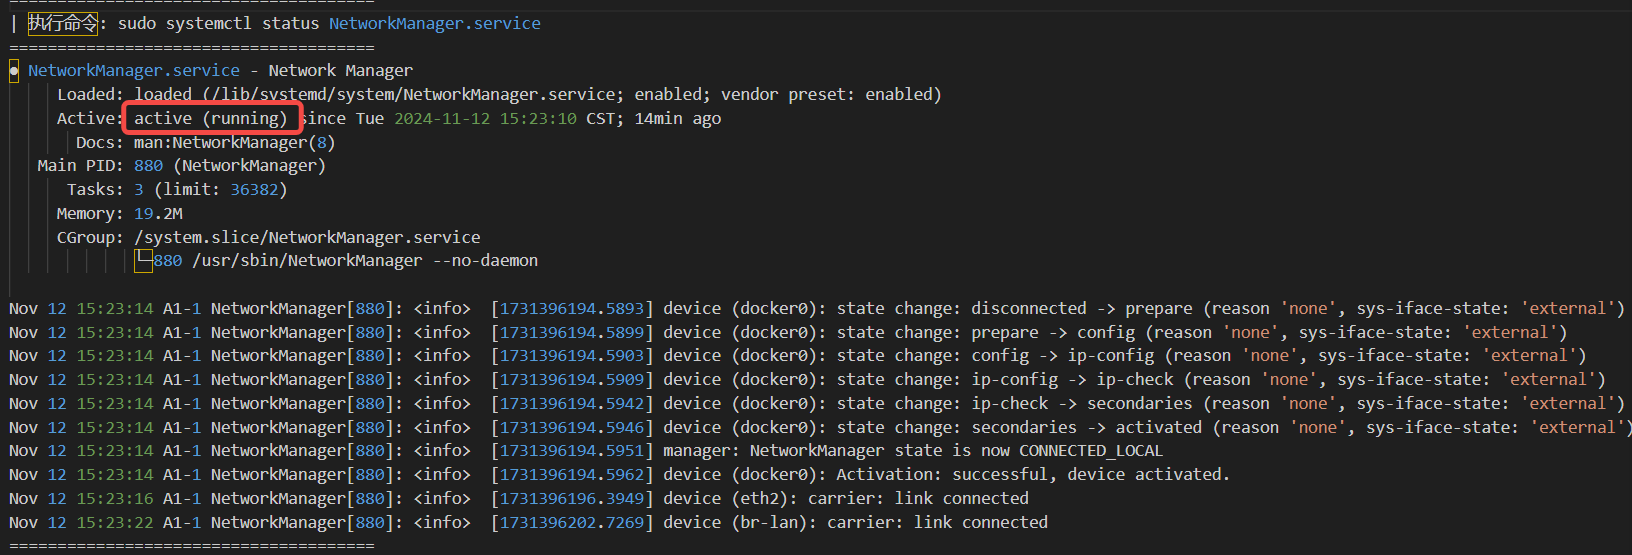
If the NetworkManager.service is not running, try restarting the service manually with sudo systemctl restart NetworkManager.service.- If the service fails to start after a manual restart, you need to troubleshoot the specific cause based on the error message. You can upload a screenshot of the startup failure to the fault ticket system.- If the service starts normally after a manual restart, you need to investigate why the service did not start automatically. You can upload a screenshot of the automatic startup failure to the fault ticket system.
Check item 4: Re-flash the image to verify if it is caused by the software environment#
Step 1: Flash the image#
Method for flashing the image:https://doc.miivii.com/Apex-AD10-User-Manual-CH/wiki/Apex-AD10-%E5%9B%BA%E4%BB%B6%E7%83%A7%E5%86%99.html
After the image flashing is completed, verify whether 4G/5G can connect to the network normally.
After flashing the image, if 4G/5G can communicate normally, it indicates that the issue is caused by the system software environment, and the customer needs to check the software environment by themselves.
After flashing the image, if 4G/5G cannot connect to the network normally, execute “Step 2”.
Step 2: Obtain the log#
Then, after connecting the device to the external network, open the terminal and enter:
curl -sSL https://doc.miivii.com/scripts/run_miivii_diagnostic.sh | bash -s 4g     #Command to obtain diagnostic logs for 4G faults

curl -sSL https://doc.miivii.com/scripts/run_miivii_diagnostic.sh | bash -s 5g     #Command to obtain diagnostic logs for 5G faults
And export the logs and upload them to the fault work order system (the analysis will be performed by Miwen after-sales engineers).